06 August 2026
Migrating Inventory with Lot Tracking
Importing opening inventory with lot numbers into Business Central. Which tables a configuration package really needs, and why table 336 sends you the wrong way.
The Challenge
When migrating a customer from a legacy system to Microsoft Business Central, we often need to import inventory opening balances with item tracking. On the internet you’ll find ways to do this, typically by using a configuration package. So far, this is correct, since the configuration package is the native tool to be used in Business Central for data migration activities.
Unfortunately, there’s ambiguity about the tables to use in the configuration package. With this article, I want to explain how you can successfully import opening inventory, which tables to use, and why.
The Setup
First of all, if an item is lot tracked, be sure to create the item with the field Item Tracking Code filled in. In the table Item Tracking Codes, the boolean Lot Specific Tracking must be checked.

Lot Specific Tracking determines that outbound transactions must be matched against the specific lots that came in — Business Central tracks which lot you consume. Whether a lot no. is required on a given transaction is controlled separately, on the Inbound and Outbound tabs of the Item Tracking Code. LOTALL has all of them enabled, which is why every transaction in this example needs a lot no.
A Helpful Hint
If you don’t know which tables to include in a configuration package, do the action manually for one or a few items. For instance: create a customer, or enter a few lines in a general journal, and see what tables and what fields are filled.
For the inventory opening balance, we will use an item journal. We start from an “empty” company, without item transactions, and we can consider the inventory opening balance as a positive adjustment: we have zero stock for a number of items, and we increase this stock to its real quantity. Therefore, in the item journal, we will create lines with the type Positive Adjustment. Do not post the journal — we want to look afterwards at which tables and fields were used.

And when clicking Line / Item Tracking Lines, we can enter the lot nos. with their respective quantities.

Evidently, the sum of the quantities of the different lot nos. must be equal to the quantity on the item journal line.
Now that we have entered our inventory information, we can take a look at the tables used. The table used for the item journal is 83, but we need to take a closer look at the item tracking lines:
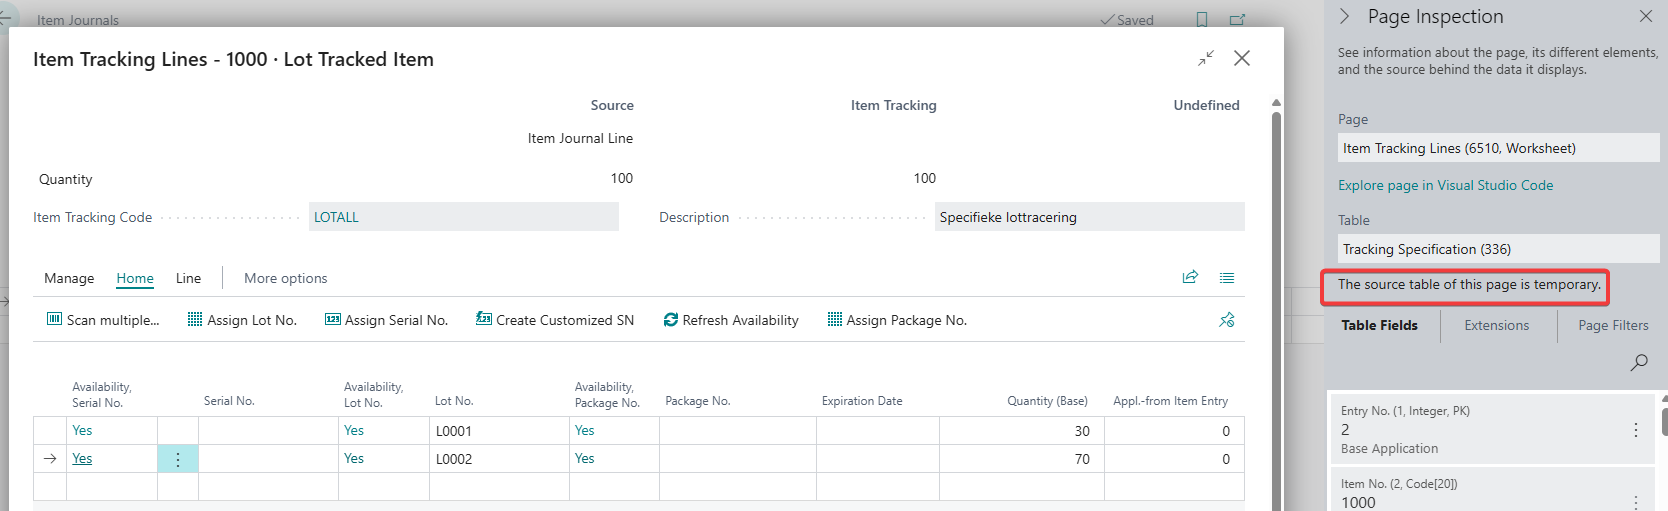
This screenshot shows that the table no. is 336, but more important is the message below: The source table of this page is temporary. In other words, as soon as we leave this page, the data is no longer available in table 336. We can check this by running the table: on the URL of your role center, add &table=336, press Enter, and you won’t see these two lines.
So the next question is: where did these lines go? Let me tell you a secret: they are not in 336, but in table 337, Reservation Entry. I agree that the table name is somehow misleading, but run the table (again by adding &table=337):

This last screenshot shows us some interesting information. We can see both our lot no. lines with their quantities. But even more important:
- Entry No. is an auto-increment field. In your config pack, start at 1 and increment from there.
- The Reservation Status is Prospect — the tracking is not yet linked to an actual item ledger entry, which is why Item Ledger Entry No. is still 0.
- The Source Type is 83, referring to the Item Journal Line table.
- Source Subtype must be 2, indicating this is a positive adjustment.
- Source ID refers to the journal template name.
- Source Batch Name refers to your journal batch name.
- Most important is Source Ref. No.: this is the reference to the line number of the item journal line. In other words, this links the item tracking line to the item journal line. Note that both lot lines share the same value (10000), because they belong to the same journal line.
- Finally, if we scroll further to the right, we also see that the quantity is given as Quantity (Base), Quantity, Qty. to Handle (Base) and Qty. to Invoice (Base).
Configuration Package
Now that we know our tables, let’s create the configuration package. In this blog I will not explain how to create a config pack, so select the tables 83 and 337, select all fields, and export. Doing so, we’re sure we don’t miss any of the fields required. You export the config pack to Excel, and you’ll see the item we just created as a test.
In Business Central there is no NULL for numeric fields: an empty numeric field and 0 are the same thing. So the columns showing 0 in the example — Transferred from Entry No., Source Prod. Order Line, Item Ledger Entry No. — can simply be left at zero.
Take the export from your legacy system, fill in all the columns required in the Excel template, and save. Back in Business Central, we import from Excel and apply the data.
The order of the tables takes care of itself here: a configuration package processes its tables in ascending table number, so 83 is applied before 337 — which is exactly the dependency we need. You can apply the package in one go.
Posting the Journal
This is not the end of the process. We now have a filled item journal, with lines for all items with lot tracked inventory, and the item tracking lines are imported as well. In a final step we post the item journal, and this will result in item ledger entries for every combination of item number and lot no.